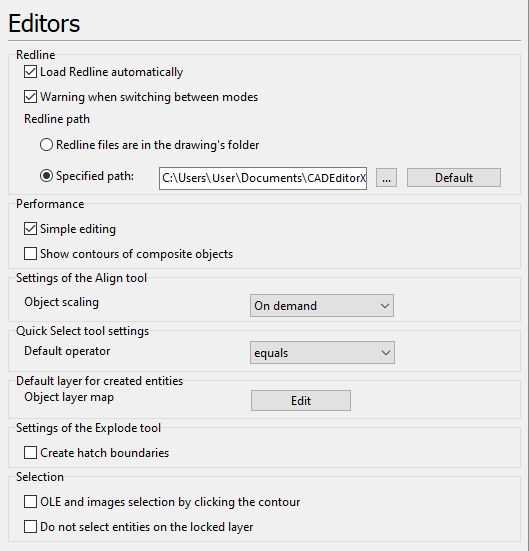
The tab contains settings for the Redline mode. It allows to specify the path to the folder with markup files, where they will be searched for at the automatic loading.

Redline
•Load Redline automatically - loading the Redline file when a respective CAD is opened. The search for the Redline files is fulfilled in the directory which is specified in the section Redline Path of the selected tab of the dialog box Options. The automatic loading of the Redline file is possible only under condition that the default name like FileName_dxf$$Model.DXF was selected while saving and the file name was not changed.
•Warning when switching between modes - if this option is on a warning window appears when switching between modes if some changes were made but were not saved. Rejecting the saving doesn't delete the performed changes, they are saved in the current session of the program until the drawing is closed. After closing the drawing they will be lost.
•Redline path defines a folder for default Redline files storing. It will be used for automatic search for them when the option Load Redline automatically is checked.
oRedline files are in the drawing's folder - select this option for Redline files to be saved in the same folder with the respective CAD files.
oSpecified path - select this option for Redline files to be saved in a specified folder. Press ![]() to set custom path. Press Default button to reset Redline path to ..\CADEditorX 16\Redline\ folder (path defined while installing CADEditorX).
to set custom path. Press Default button to reset Redline path to ..\CADEditorX 16\Redline\ folder (path defined while installing CADEditorX).
oDefault. Click on the button [Default] to reset all the performed settings in the section Redline Path.
Performance
•Simple editing. The mode of simplified editing of complex objects. In this mode while selecting a block reference one marker is shown in the top left corner. The object Rectangle is called a polyline.
•Show contours of composite objects. The mode of a simplified relocation of composite objects. When this option is on, while relocating a block reference, contours of the objects included in it are shown. But it should be remembered that relocation of block references containing a large number of objects can cause long slowdowns. That is why it is recommended to switch off the option.
Settings of the Align tool:
•Object scaling. Selection of the action that will be applied to the objects as a result of the use of the Align tool.
oIf Do not scale is set, objects will be aligned by the aligning points and dimensions won't be changed.
oIf Scale is set, objects will be aligned by aligning points and dimensions will be changed proportionally.
oIf On demand is set, when aligning points are selected a window appears where the user accepts or cancels scaling of the aligned objects.
Default layer for created entities
•Object layer map. The option is used to arrange simple objects on layers during their creation. When you click the Edit button, the Object Layer Map Editor window is opened. In this window, you can specify a layer on which a particular object will placed during its creation. Object arrangement and layer parameters are configured with the help of the MapEntities.xml file.
Settings of the Explode tool
•Create hatch boundaries. The option turns on/off creation of hatch during its explosion.
•OLE and images selection by clicking the contour. Turns on/off selection of the OLE and Image entities by their contour.
•Do not select entities on the locked layer. When the option is switched on, entities located on the locked layer won't be selected.
Go to CADEditorX